This mod is no longer actively being developed because it has been superseded by Areas, which works in multiplayer!
This mod only works in singleplayer.
Named Areas is a minimalistic configurable mod which allows the creation of custom named areas/towns with a radius or by biome using signs with messages via GUI or chat. Any player entering or leaving the area will receive a message, which is configurable in the config. Overlap of areas is allowed.
Configurable
__sendChatMessages (default = false):
When enabled, sends the player the area notifications in chat.
__showHUDMessages (default = true):
When enabled, sends the player the area notifications in the HUD on screen.
_HUDOnlyAreaName (default = false):
When enabled, only shows the areaname in the HUD. When disabled, the prefixes and suffices will also be used.
_HUDMessageFadeDelayMs (default = 3500, min 100, max 360000):
The delay in ms after which the HUD message should fade out.
_HUDMessageHeightOffset (default = 10, min 0, max 3000):
The vertical offset (y coord) for the HUD message. This determines how far down the message should be on the screen. Can be changed to prevent GUIs from overlapping.
_HUD_RGB_R (default = 100, min 0, max 255):
The red RGB value for the HUD message.
_HUD_RGB_G (default = 200, min 0, max 255):
The green RGB value for the HUD message.
_HUD_RGB_B (default = 50, min 0, max 255):
The blue RGB value for the HUD message.
joinPrefix (default = "Entering "):
The prefix of the message whenever a player enters an area.
joinSuffix (default = "."):
The suffix of the message whenever a player enters an area.
leavePrefix (default = "Leaving "):
The prefix of the message whenever a player leaves an area.
leaveSuffix (default = "."):
The suffix of the message whenever a player leaves an area.
biomeJoinPrefix (default = "Entering a biome named "):
The prefix of the message whenever a player enters a named biome area.
biomeJoinSuffix (default = "."):
The suffix of the message whenever a player enters a named biome area.
biomeLeavePrefix (default = "Leaving a biome named "):
The prefix of the message whenever a player leaves a named biome area.
biomeLeaveSuffix (default = "."):
The suffix of the message whenever a player leaves a named biome area.
How it works:
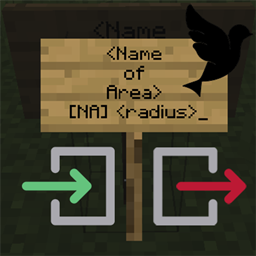
The first three lines are part of the area name. The last line contains "[NA]" (named areas) and "<radius>" the radius in blocks around the sign. 
An example:
For example, if you want an area named "The Meadow" with a radius around the sign of 30 blocks:
Whenever a player enters the radius, they'll receive a message with the area name and the prefix/suffix from the config.
Instead of the <radius>, you may also specify a whole biome as a named area. You can do this by specifying the line last line as "[NA] biome" This creates a plains biome named "Far Reaching Plains":
Any message can also be shown in the GUI or in the chat, or both.
Here you can see the complete leave/join messages in the GUI, with the biome radius:

Here you can see the same thing, except with just an area name:

And for good measure, the GUI feature with a radius sign:

You can set the global RGB value for HUD messages in the config, but specific colours per sign are also possible. You'll have to sacrifice some space for the name, but may enter the (RGB) colour code in the third line as "[RGB] r, g, b". 
Here's an example:


------------------
You may freely use this mod in any modpack, as long as the download remains hosted within the CurseForge ecosystem.
Serilum.com contains an overview and more information on all mods available.
Comments are disabled as I'm unable to keep track of all the separate pages on each mod.
For issues, ideas, suggestions or anything else there is the Github repo. Thanks!
No files available for download.