Model Citizens allows you to place player or skeleton character models into the world which can be fully posed, wear armor, hold items, and have a complete inventory that players can loot. You can use your own custom textures, or use the standard player textures uploaded to Mojang.
It was intended for custom maps where you want players to find items and lore on fallen heroes, but you can use it for pretty much anything!
Models can be spawned by using a Model Placer item, craftable using the recipe:
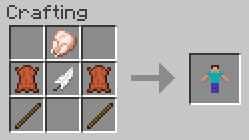
Crafting of the Model Placer can be disabled in the config if desired. Using a newly crafted Model Placer produces a Steve model by default, facing your orientation.
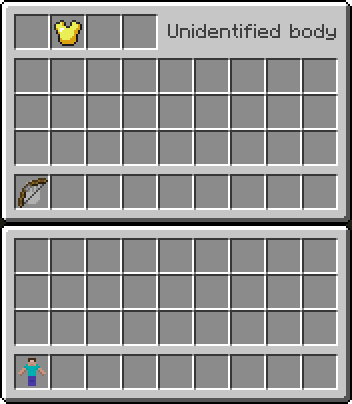
Right-clicking a model provides you access to its inventory. At the top left are standard armor slots, which will render on the model. The top right area will display the model's name. Below is a standard player inventory arrangement, with the bottom-left slot having a hand icon. Any object you place in this slot will render in the model's hand.
There's a config option available if you wish to disable the player's ability to place items back into the inventory in survival mode.
When invulnerability config option is disabled, models are weak against shovels, but are still invulnerable to explosion damage. This prevents accidental removal of important models (and their inventories) from your maps. When broken, the model drops its full inventory and optionally a Model Placer item (enabled by default). The item will retain its information and can be placed again in the world, with only its orientation changing when placed.
When in creative mode, using middle-click to pick the block will similarly duplicate a model, as well as its entire inventory. This allows you to quickly place many similar copies in the world.
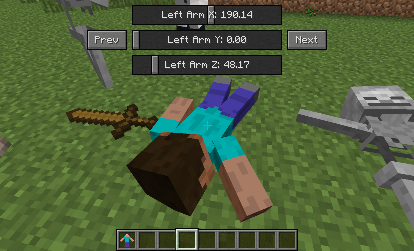
To pose and customize a model, shift-right click its base with an empty hand while in creative mode to get its configuration GUI (can be disabled for players in survival mode via the config). There are several pages of settings. The initial page allows you to specify the model type (either standard or skeleton), and to enter a username to use for the texture. The other pages allow you to set the model's orientation.
Using the mouse wheel in the configuration GUI will either flip through the pages or finely tune a slider control depending on what you're hovering over. Holding shift while doing this will adjust a slider even more precisely.
Right-clicking in the configuration GUI will toggle the controls up and down, allowing you to move it out of the way while posing it. Both the position and the page will be remembered if you exit the GUI, making it easy to pick up where you left off if you have to move your character for a better view while posing.
If you wish to use a different display name than the texture name, or want to use a default Steve or skeleton texture along with a custom name, then the exclamation mark can be used as a separator. Texture name goes first, then display name. Leave the texture name blank to use the default Steve or skeleton ones.
Model textures are searched for locally first, from within the config/modelcitizens folder. If not found there it will pull the standard model for that player from Mojang's servers. Your custom textures should be in PNG format, and the filenames all lowercase.
No files available for download.