Loading...
Beta Modpages Unclaimed

Lanterns Belong on Walls

Allows you to place lanterns on walls

0 Likes
105259 Downloads
Created by CoalTheBurnRock

Description

How?

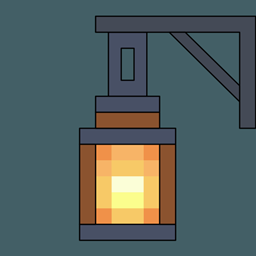
For supported lanterns, place the lantern on the side of the block, and the lantern will attach to that side.

Compatibility

For another mod's lanterns to be compatible, the other mod must add the compatibility.

Note: If you're using a resource pack that changes the lantern blockstate file, then the visual connection to the wall might not appear.

<details> <summary>For mod developers</summary>

The basics for adding support for lanterns differs between mod loaders.

The details below are for Fabric/Architectury Loom.

For NeoForge

<details>

  1. Add the Gradle dependency:
   repositories {
       //...
       maven {
           name = "Modrinth"
           url = "https://api.modrinth.com/maven"
       }
   }

   dependencies {
       //...
       modImplementation "maven.modrinth:lanterns-bow:${lanterns_bow_version}"
   }

Refer to the versions page for the most recent version.
Read about the Modrinth Maven here.

  1. In your mod constructor, listen for the mod bus event, then add the lanterns:
   public ExampleModContstructor(IEventBus modBus) {
       modBus.addListener((WallLanternsEvent event) -> {
           event.addLantern(new WallLantern(
                   WallLantern.Type.StandardCutout,
                   ResourceLocation.parse("example:example_lantern"))
           );
           event.addLantern(new WallLantern(
                   WallLantern.Type.Standard,
                   ResourceLocation.parse("example:example_lantern_two"))
           );
       });
   }

</details>

For Fabric

<details>

  1. Add the Gradle dependency:

    repositories {
        //...
        maven {
            name = "Modrinth"
            url = "https://api.modrinth.com/maven"
        }
    }
    
    dependencies {
        //...
        modImplementation "maven.modrinth:lanterns-bow:${lanterns_bow_version}"
    }

    Refer to the versions page for the most recent version.
    Read about the Modrinth Maven here.

  2. Create an entrypoint class:

   public class ExampleLanternModWall implements WallLanternsEntrypoint {
       @Override
       public void registerLanterns(WallLanternsRegistry registry) {
           registry.registerLantern(ResourceLocation.fromNamespaceAndPath("examplemod", "lantern"));
       }
   }
  1. Add the entrypoint to your fabric.mod.json:
   ...
   "entrypoints": {
       ...
       "walllanterns": "com.example.mod.examplemod.ExampleLanternModWall"
   }

</details>

Lantern Types

Unless otherwise specified all models for lanterns are derived from the standing model of the provided lantern.

There are a few lantern types available:

  • Standard - Uses the vanilla standing lantern shape.
  • StandardCutout - Designed for NeoForge. Follows the same rules as Standard, but forces the use of the cutout Render Type on NeoForge.

</details>


AD Become Premium to remove Ads!

What means Verified?

  • Compatibility: The mod should be compatible with the latest version of Minecraft and be clearly labeled with its supported versions.
  • Functionality: The mod should work as advertised and not cause any game-breaking bugs or crashes.
  • Security: The mod should not contain any malicious code or attempts to steal personal information.
  • Performance: The mod should not cause a significant decrease in the game's performance, such as by causing lag or reducing frame rates.
  • Originality: The mod should be original and not a copy of someone else's work.
  • Up-to-date: The mod should be regularly updated to fix bugs, improve performance, and maintain compatibility with the latest version of Minecraft.
  • Support: The mod should have an active developer who provides support and troubleshooting assistance to users.
  • License: The mod should be released under a clear and open source license that allows others to use, modify, and redistribute the code.
  • Documentation: The mod should come with clear and detailed documentation on how to install and use it.

AD Become Premium to remove Ads!

How to Install

1

Download Forge & Java

Download Forge from the offical Site or here. If you dont have Java installed then install it now from here. After Downloading Forge you can run the file with Java.

2

Prepare

Lounch Minecraft and select your Forge istallation as Version this will create a Folder called Mods.

3

Add Mods

Type Win+R and type %appdata% and open the .minecraft Folder. There will you find your Folder called Mods. Place all Mods you want to play in this Folder

4

Enjoy

You are now Ready. Re-start your Game and start Playing.

More Mods like this

Quark

A Quark is a very small thing. This mod is a collection of small things that improve the vanilla minecraft experience.

Chisel

A builder's best friend.

Better Advancements

Successor to BetterAchievements for the new advancements system in minecraft 1.12+

Cosmetic Armor Reworked

This mod allows you to wear two sets of armor, one for display, one for function.

Macaw's Doors

Adds vanila doors with every wood color and new unique doors!

MalisisDoors

New animations for doors. You can build you own doors with millions of possibilities!

Macaw's Roofs

Build roofs with actual roofs instead of stairs!