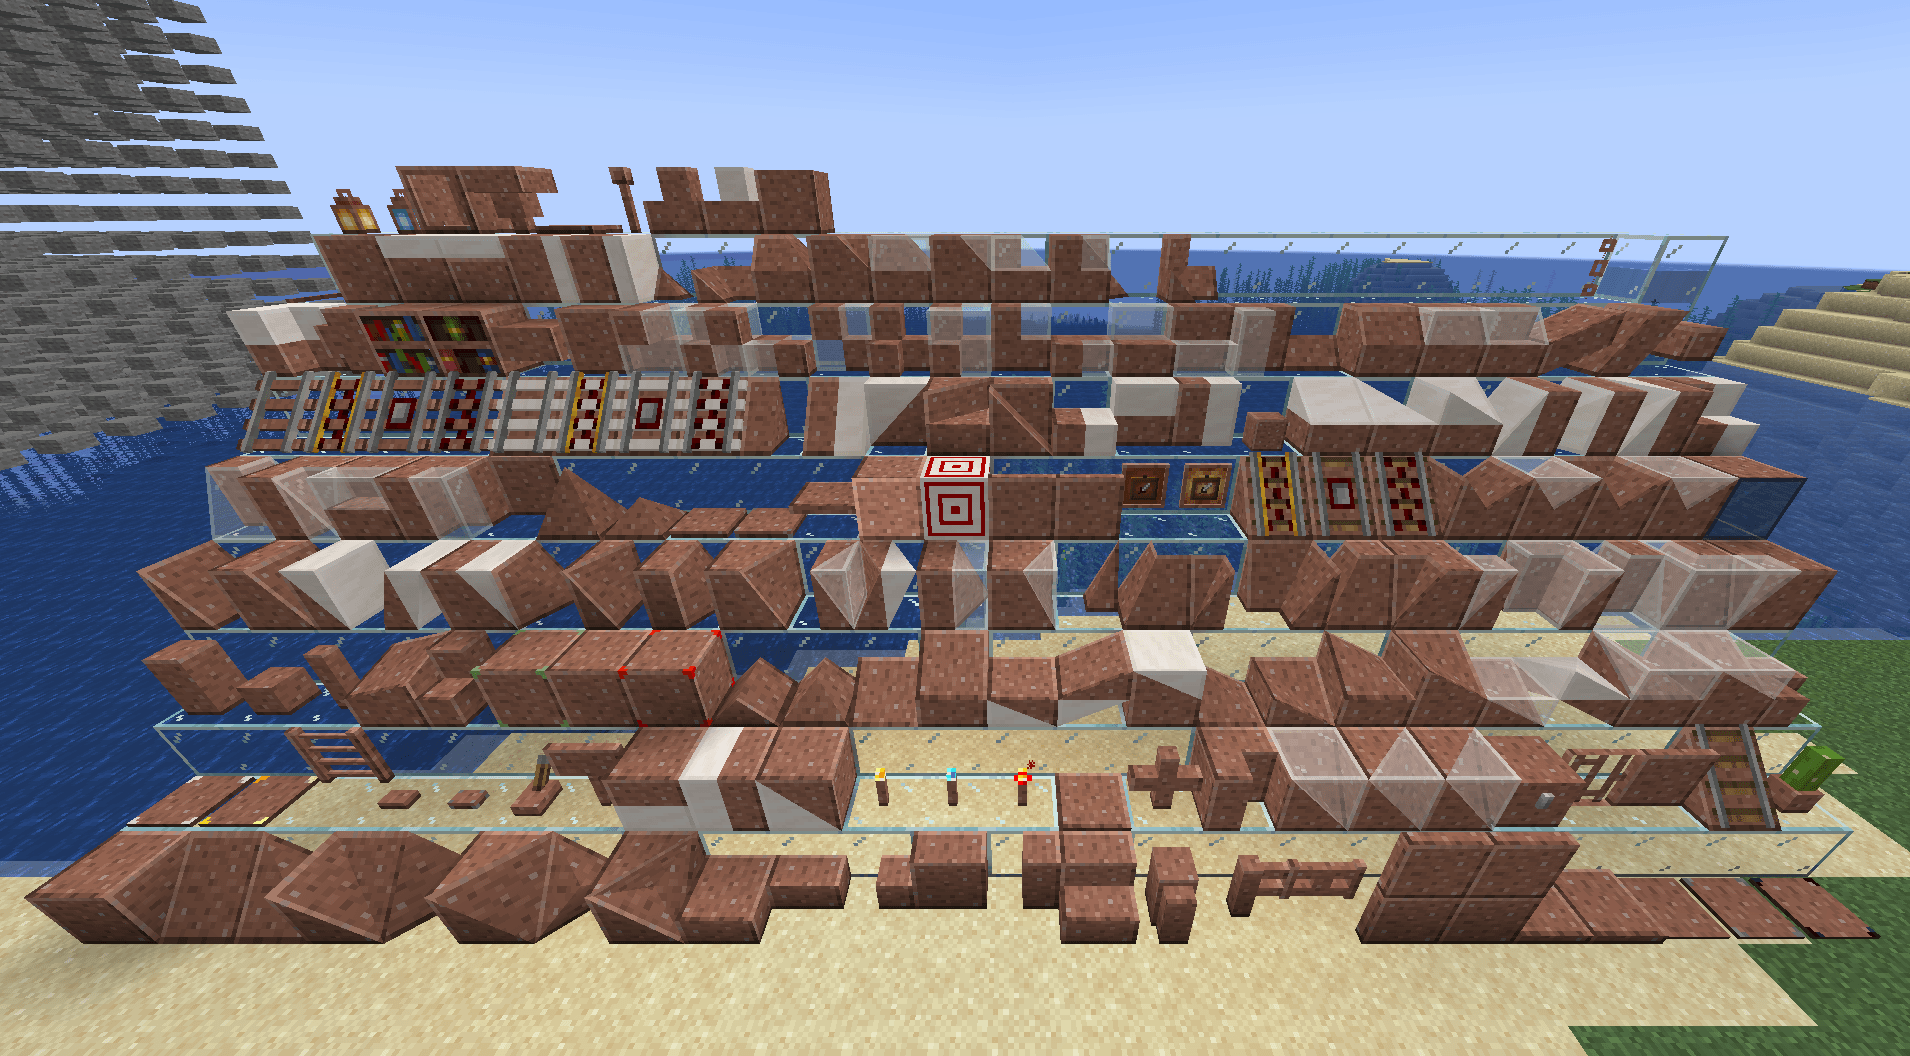
FramedBlocks adds blocks of various shapes that can be made to look like almost any other block in the game.
Contents
The following shapes as seen on the picture above from left to right, front to back are currently implemented:
- Framed Cube
- Framed Slope (can also be placed vertically)
- Framed Corner Slope (can also be placed vertically)
- Framed Inner Corner Slope (can also be placed vertically)
- Framed Prism Corner
- Framed Inner Prism Corner
- Framed Threeway Corner
- Framed Inner Threeway Corner
- Framed Slab
- Framed Slab Edge
- Framed Slab Corner
- Framed Panel
- Framed Corner Pillar
- Framed Stairs
- Framed Wall
- Framed Fence
- Framed Fence Gate
- Framed Door
- Framed Iron Door
- Framed Trapdoor
- Framed Iron Trapdoor
- Framed Pressure Plate
- Framed Stone Pressure Plate
- Framed Obsidian Pressure Plate
- Framed Weighted Pressure Plate (Heavy)
- Framed Weighted Pressure Plate (Light)
- Framed Ladder
- Framed Button
- Framed Stone Button
- Framed Lever
- Framed Sign
- Framed Double Slab
- Framed Double Panel
- Framed Double Slope (can also be placed vertically)
- Framed Torch
- Framed Soul Torch
- Framed Redstone Torch
- Framed Floor Board
- Framed Lattice
- Framed Vertical Stairs (interacts with Stairs, Framed Stairs and Framed Half Stairs to create a corner)
- Framed Double Corner (can also be placed vcertically)
- Framed Double Prism Corner
- Framed Double Threeway Corner
- Framed Chest
- Framed Bars
- Framed Pane
- Framed Rail Slope
- Framed Flower Pot
- Framed Pillar (can be placed on all three axis)
- Framed Half Pillar (can be placed in all six directions)
- Framed Post (can be placed on all three axis)
- Framed Collapsible Block
- Framed Half Stairs
- Framed Bouncy Cube
- Framed Secret Storage
- Framed Redstone Block
- Framed Prism
- Framed Sloped Prism
- Framed Slope Slab (hold sneak key to place upside down)
- Framed Elevated Slope Slab
- Framed Double Slope Slab (hold sneak key to place upside down)
- Framed Inverse Double Slope Slab
- Framed Elevated Double Slope Slab
- Framed Flat Slope Slab Corner
- Framed Flat Inner Slope Slab Corner
- Framed Flat Elevated Slope Slab Corner
- Framed Flat Elevated Inner Slope Slab Corner
- Framed Flat Double Slope Slab Corner
- Framed Flat Inverse Double Slope Slab Corner
- Framed Flat Elevated Double Slope Slab Corner
- Framed Flat Elevated Inner Double Slope Slab Corner
- Framed Vertical Half Stairs
- Framed Slope Panel
- Framed Extended Slope Panel
- Framed Double Slope Panel
- Framed Inverse Double Slope Panel
- Framed Extended Double Slope Panel
- Framed Flat Slope Panel Corner
- Framed Flat Inner Slope Panel Corner
- Framed Flat Extended Slope Panel Corner
- Framed Flat Extended Inner Slope Panel Corner
- Framed Flat Double Slope Panel Corner
- Framed Flat Inverse Double Slope Panel Corner
- Framed Flat Extended Double Slope Panel Corner
- Framed Flat Extended Inner Double Slope Panel Corner
- Framed Double Stairs
- Framed Vertical Double Stairs
- Framed Wall Board
- Framed Pyramid
- Framed Pyramid Slab
- Large Framed Button
- Large Framed Stone Button
- Framed Horizontal Pane
- Framed Glowing Cube (glows in the dark without emitting light)
- Framed Target (Target markings can be dyed)
- Framed Gate
- Framed Iron Gate
- Framed Item Frame
- Framed Glow Item Frame
- Framed Powered Rail Slope
- Framed Detector Rail Slope
- Framed Activator Rail Slope
- Framed Inner Prism
- Framed Double Prism
- Framed Inner Sloped Prism
- Framed Double Sloped Prism
- Framed One-Way Window
- Framed Fancy Rail
- Framed Fancy Powered Rail
- Framed Fancy Detector Rail
- Framed Fancy Activator Rail
- Framed Fancy Rail Slope
- Framed Fancy Powered Rail Slope
- Framed Fancy Detector Rail Slope
- Framed Fancy Activator Rail Slope
- Framed Half Slope
- Framed Divided Slope
- Framed Double Half Slope
- Framed Sloped Stairs
- Framed Vertical Sloped Stairs
- Framed Divided Slab
- Framed Divided Panel (Horizontal)
- Framed Divided Panel (Vertical)
- Framed Mini Cube
- Framed Stacked Slope Slab
- Framed Flat Stacked Slope Slab Corner
- Framed Flat Stacked Inner Slope Slab Corner
- Framed Stacked Slope Panel
- Framed Flat Stacked Slope Panel Corner
- Framed Flat Stacked Inner Slope Panel Corner
- Framed Divided Stairs
- Framed Vertical Divided Stairs
Usage
Right click the block with almost any solid block to make it look alike.
Right click the block with a fluid container to make it look like the fluid in the container (1.19+).
Right click the block with Glowstone Dust to make it produce light.
Right click the block with a Framed Hammer to remove the camo.
Right click the block with an empty fluid container to remove a fluid camo (1.19+).
Framed Prism, Inner Prism and Double Prism Corners automatically activate a texture offset depending on their position when placed. This fixes the issue of prism corners not fitting together properly when building a larger surface out of these blocks. If this behaviour is not desired, you can toggle the offset state by left clicking the block with the Framed Hammer.
The Framed Wrench (and any other item in the c:tools/wrench tag) can be used to rotate the Framed Block. On most blocks, the rotation behaviour is dependent on the face that was clicked.
The Framed Screwdriver can be used to cycle through different states of the camo block.
The Framed Blueprint allows copying Framed Blocks including their camo and glowing state. The rotation of the Framed Block itself is not copied.
The Framed Collapsible Block can be modified to create arbitrary slopes by changing the height of the four corners of a single block face with the Framed Hammer. Left click the corner on the face you want to change to move the face inward and left click the corner while sneaking to move the face outward. This modification can only happen on a single face at once and only within the bounds of a full block.
When activated in the server config, most blocks can be right-clicked with a Phantom Paste to make them intangible, allowing you to move through them.
To remove this, right click the block with a Framed Screwdriver while crouching.
The latch of the Framed Chest can be switched between three modes by left clicking the chest with a Framed Hammer:
- Default chest latch (default state)
- Camo-textured latch
- No latch
The Framed Key allows locking certain Framed Blocks in their current shape to suppress neighbor updates. This allows placing blocks in configurations that would not be possible with the desired neighbors (i.e. placing Framed Stairs in the corner shape without keeping the necessary neighbors to force that shape).
The Framed Pressure Plates (all variants) can be switched between waterloggable and non-waterloggable by left-clicking them with a Framed Hammer. Their default state is non-waterloggable to match vanilla behaviour.
Make sure to enable the experimentalForgeLightPipelineEnabled setting in the forge-client.toml config file to get proper lighting on all shapes.
Configuration
FramedBlocks offers a few configuration options to tweak certain behaviour
Client:
- showGhostBlocks: Shows a half transparent placement aid when a Framed Block is held (default: true)
- fancyHitboxes: Draw custom hitboxes on blocks like the slope instead of their actual stair step collision box (default: true)
- detailedCulling: Hides faces between Framed Blocks if applicable even if the face doesn't fill the whole block face (default: true)
Server:
- allowBlockEntities: Whether blocks with BlockEntities can be placed in Framed Blocks (default: false)
- Note: placing BlockEntities in Framed Blocks may in rare cases lead to crashes. To fix a crashing block, either disable this config setting or add the offending block to the blacklist tag, the camo(s) conflicting with either change will then be removed when the block is loaded
- enableIntangibleFeature: Enables the intangibility feature. Disabling this also prevents moving through blocks that are already marked as intangible (default: false)
- fireproofBlocks: Makes Framed Blocks completely fireproof by disabling dynamic flammability (default: false)
Datapack Features
If a block cannot be placed in a Framed Block and you think that it should be, you can add the block to the framedblocks:frameable tag via a datapack. An example can be found here.
If a block can be placed in a Framed Block and you think that it shouldn't be, you can add the block to the framedblocks:blacklisted tag via a datapack. An example can be found here.
Known Issues
- Effects provided by shaders loaded through Iris such as reflectivity are not present when such a block is applied as a camo
- A Framed Block whose base model uses textures that use CTM features via a resource pack will not render camos (i.e. making the redstone block texture fullbright will break the Framed Redstone Block)