This mod lets you take control of the chat channels your server offers, by showing them which one is active, and allowing you to switch channels even while typing in chat.
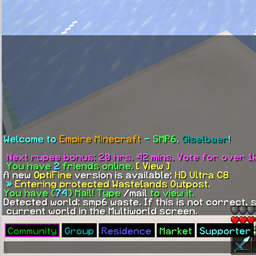
While you're playing, it shows the active channel name at the left bottom of the screen (where the chat input line goes), and when you start typing, it shows a row of buttons that let you switch chat channels, highlighting the active one. This is how it looks to me:

Here, whatever I type gets sent to LukeLantern. Of course I know this as I've just been chatting with him, but often enough, after a conversation, I forget I'm still in that channel, and when I want to write something in community chat a while later, it gets sent to Luke anyway. This UI reminds me I'm still talking to Luke, and lets me just press the Community button to redirect what I'm saying.
Your server may offer different channels (this example is from play.emc.gs), so you can configure which channels you have, how to detect channel switches, and which commands to use to switch channels.
Please note: this mod does *not* add chat channels to your multiplayer world. It's intended to improve your control over existing channels your server gives to you.
If you're playing on Empire Minecraft (emc.gs), the mod will work for you right out of the box. If you're playing somewhere else where chat commands and responses are different, you'll need to change the configuration to match your server. For each chat channel, you need to know the command to enter it, and the message the server sends you when you enter.
Create a file named chatcontrol-channels.txt in your config folder. If you don't, the mod will create it itself the first time you run it. Then, configure your channels like by line, like this:
§2Community;/chat c;Chat focus set to channel Community
Each line consists of three columns, separated by semicolons (;) :
You can omit the second column if there's no specific command to enter that channel, but that means you won't have the clickable button.
If you have message channels to PM to people (not using /msg or /r, instead, temporarily sending all chat to someone), you can include their name in the channel name. For example, EMC sends "Started private conversation with DavisAtDavis" when I enter a conversation with him. To grab his name, I use "Started private conversation with (.*)" in the third column, and add a fourth one that has just the text string "usetext" in it. This will grab the name from the server message, and append it to the channel name.
I was asked if the mod could be made to work with the server-side plugin uchat, which features a discord connection. Yes it can! This is an example for a configuration that has the three default uchat channels (Local, Global, Admin) and another channel named Discord. As explained above, put this into the chatcontrol-channels.txt file in your config folder:
§2Global;/ch global;\[uChat\] Now you are in the channel Global.
§eLocal;/ch local;\[uChat\] Now you are in the channel Local.
§bAdmin;/ch admin;\[uChat\] Now you are in the channel Admin.
§3Discord;/ch discord;\[uChat\] Now you are in the channel Discord.
The default message includes a [uchat] at the beginning of the line, and because [ and ] are special characters, they need to be escaped with a backslash (\). The color codes at the start of each line are optional but make the UI look better, and correspond to the chat channel's colors.
No files available for download.